AQA GCSE Physics Paper 2 (8463/2H)Paper 2: every question, answered
We analysed every Higher Tier Physics Paper 2 AQA has set since 2020, question by question. Some question types come back in almost identical form every single year, just with a different context or different numbers. Below is exactly what those recurring question types have asked, the real mark scheme structure behind them, and a complete worked answer for each sitting we have. This is the closest you can get to seeing exactly how full marks are earned without a real exam paper in front of you.
Questions © AQA, quoted for analysis. Diagrams and data described in our own words, not reproduced. Mark scheme content translated into plain English, not copied. PrepWise is independent and not endorsed by AQA.
The paper is a template
Same 10 question types, every sitting“Describe a method the student could have used to obtain these results, or describe a method to test this hypothesis”
Every sitting we analysed included one 6 mark 'describe a method' question, marked on a three band level of response worth 5 to 6, 3 to 4, or 1 to 2 marks, that rewards a complete, logically sequenced method over a jumbled list of steps. The topic changes every year, refraction, springs, infrared radiation, but the marking structure does not.
1×asked“Describe a method the student could have used to obtain the results shown in Figure 4.”
“Describe a method the student could have used to obtain the results shown in Figure 4.”
What it’s really asking
It wants the practical steps for measuring how the angle of refraction changes as the angle of incidence increases, using a ray box and a glass block, in enough detail and the right order that another student could repeat it and get a similar set of results.
What the sources actually showed — June 2020
A photograph of a ray box shining a single narrow ray of light onto a rectangular glass block sitting on a sheet of white paper.
A scatter graph of angle of refraction (up to 45 degrees) against angle of incidence (up to 80 degrees), with points plotted at 10 degree intervals showing refraction increasing more slowly than incidence.
The full worked answer — June 2020
I would place the glass block onto a sheet of white paper and trace its outline in pencil, so I could return it to exactly the same position after each measurement. Then I would remove the block and draw a line at right angles to the flat surface, at the point where the light ray was going to enter, to act as the normal.
Before turning the ray box on, I would use a protractor centred on that point to draw a straight guide line at the angle of incidence I was testing, starting at 10 degrees from the normal. Doing this before switching the ray box on meant the angle of incidence was set by my construction, not something I had to work out afterwards from marks on the paper.
I would put the block back inside its traced outline, switch the ray box on, and swing the box round until the visible incoming ray lined up along the guide line and struck the block at the marked entry point. Watching the ray while the box was lit let me confirm it really was hitting the glass at the angle I had drawn, rather than relying only on dots left after the block had been taken away.
With the ray box still lit, I would mark a small pencil dot where the light came out on the far side of the block. Once I had switched the ray box off and lifted the block away, I would join this exit dot to the entry point with a ruled line, giving the path the ray had actually taken as it passed through the glass.
I would then place a protractor against the normal and measure the angle this ruled line made with it, which gave me the angle of refraction for that particular angle of incidence.
I would repeat the whole procedure, raising the angle of incidence in 10 degree steps up to 70 degrees, writing down the matching angle of refraction each time in a results table. Covering that full spread of angles gave me the set of paired readings needed to plot every point shown on the graph in Figure 4.
Could you have written this? Every fact in this answer is drilled in our quizzes — the writing is the easy part once the evidence is automatic.
Practise core practical questionsWhat the mark scheme rewarded
- Outlining the glass block on paper before removing it, so it can be replaced accurately
- Marking the ray where it enters and exits the block rather than trying to see through the glass
- Drawing a normal line at 90 degrees to the surface at the point of entry
- Using a protractor to measure both the angle of incidence and the angle of refraction
- Repeating the method across a full range of angles of incidence, in 10 degree steps from 10 to 70 degrees
- The normal is an imaginary line at 90 degrees to a boundary, used to measure angles of incidence and refraction
- Light slows down and bends towards the normal when it passes from air into a denser material like glass
- A ray box produces a narrow, controllable beam of light, better than a torch for this measurement
- Marking the ray's path with dots before drawing the line reduces the error from a wobbling hand
Traps examiners saw
- Trying to draw the ray while it is still passing through the glass block, rather than marking dots and removing the block first
- Forgetting to draw the normal line, without which neither angle can be measured correctly
- Only describing one single measurement instead of a repeated range across several angles of incidence
- Describing reflection instead of refraction. AQA marks a method involving mirrors and reflection as zero for this question
Full-mark self-check 0 of 5
1×asked“Describe a method the student could use to obtain the results given in Figure 4. You should include a risk assessment for one hazard in the investigation. Your answer may include a diagram.”
“Describe a method the student could use to obtain the results given in Figure 4. You should include a risk assessment for one hazard in the investigation. Your answer may include a diagram.”
What it’s really asking
It wants the full practical method for measuring how a spring's extension changes as the force on it increases, from setting up the clamp stand through to taking a full set of readings, plus one genuine, specific hazard and precaution from the investigation.
What the sources actually showed — June 2021
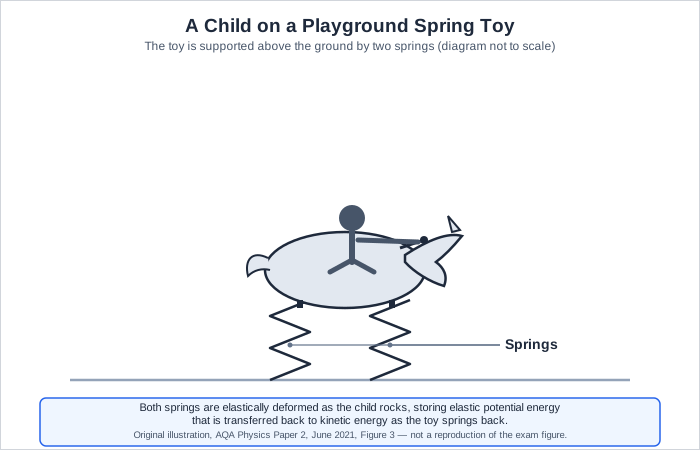
A drawing of a child on a playground spring toy, with two springs supporting the toy labelled.
A graph of force in newtons (up to 5.0 N) against extension in metres (up to 0.14 m), showing a straight line through the origin with data points plotted at roughly 0.025 m intervals.
The full worked answer — June 2021
I would set up a clamp stand with a boss and clamp, and hang the spring from the clamp so it hangs freely. Using a second clamp and boss, I would fix a half metre ruler vertically alongside the spring, then record the ruler reading level with the bottom of the unstretched spring as my starting point.
I would then hang a 1 N mass on a hanger from the bottom of the spring and record the new ruler reading, calculating the extension by subtracting the original reading from this new one. I would repeat this, adding a further 1 N each time up to a total force of 5 N, recording the extension at every force to build up the full set of results shown in Figure 4.
One hazard in this investigation is that the clamp stand, with masses hanging from it, could topple over and fall onto my feet. To reduce this risk, I would clamp the stand securely to the bench, or place heavy masses on the base of the stand to keep it stable.
Could you have written this? Every fact in this answer is drilled in our quizzes — the writing is the easy part once the evidence is automatic.
Practise core practical questionsWhat the mark scheme rewarded
- Setting up the clamp and ruler so the spring hangs freely with a fixed reference point
- Recording the unstretched length before adding any masses
- Adding force in equal steps, 1 N at a time up to 5 N, and calculating extension at each step
- A genuine hazard, the specific risk it creates, and a precaution that actually reduces that risk
- Extension is the increase in length of the spring compared to its original, unstretched length
- Force = spring constant multiplied by extension, so equal steps in force should give equal steps in extension if the spring obeys Hooke's law
- A half metre ruler clamped in a fixed vertical position removes the parallax error of holding it by hand
- The elastic limit is the point past which a spring stops returning to its original length; going past it would invalidate later readings
Traps examiners saw
- Giving a vague hazard like 'be careful' instead of a specific hazard, risk and precaution
- Forgetting to record the original, unstretched length before adding masses
- Adding masses in an inconsistent or unclear pattern instead of equal 1 N steps
- Describing how to calculate extension without ever explaining how you actually take the raw length readings
Full-mark self-check 0 of 4
1×asked“Describe a method the student could have used to obtain the results in Table 1.”
“Describe a method the student could have used to obtain the results in Table 1.”
What it’s really asking
The same refraction method as the 2020 sitting, measuring how the angle of refraction changes with the angle of incidence for a glass block, but here you are given a data table instead of a graph to obtain.
What the sources actually showed — June 2022
A table listing angle of incidence from 10 to 80 degrees in 10 degree steps, with a corresponding angle of refraction recorded for each, showing refraction increasing more slowly than incidence.
| Angle of incidence (°) | Angle of refraction (°) |
|---|---|
| 10 | 5 |
| 20 | 10 |
| 30 | 14 |
| 40 | 19 |
| 50 | 23 |
| 60 | 26 |
| 70 | 28 |
| 80 | 29 |
The full worked answer — June 2022
I would place the glass block on a sheet of paper and draw around it in pencil, so its outline stays fixed even after I take the block away, then draw a normal line at 90 degrees to the surface at the point where the light ray will enter the block.
I would use the ray box to shine a ray of light into the block at a chosen angle of incidence, marking with dots exactly where the ray enters and exits the glass. After removing the block, I would join the dots to show the ray's path and use a protractor to measure both the angle of incidence and the angle of refraction, recording the pair of values in a table.
I would repeat this for a full range of angles of incidence, increasing in steps of 10 degrees from 10 degrees up to 80 degrees, recording each pair of readings in the table. A method that uses a mirror to investigate reflection instead of a glass block to investigate refraction would not answer this question.
Could you have written this? Every fact in this answer is drilled in our quizzes — the writing is the easy part once the evidence is automatic.
Practise core practical questionsWhat the mark scheme rewarded
- Outlining the glass block before removing it and drawing the normal at the entry point
- Marking the ray's entry and exit points rather than trying to view it through the glass
- Using a protractor to measure both angles at each step
- Repeating across the full range of angles of incidence in 10 degree steps from 10 to 80 degrees
- The angle of incidence is measured between the incident ray and the normal, not the surface of the block
- Refraction happens because light changes speed when it crosses a boundary between two different materials
- A wider ray makes it harder to judge exactly where the centre of the beam enters and exits, increasing random error
Traps examiners saw
- Confusing this with a reflection experiment using a mirror. AQA explicitly scores these zero for this question
- Measuring the angle from the surface of the block instead of from the normal
- Only measuring one angle of incidence instead of a full range in equal steps
Full-mark self-check 0 of 4
1×asked“The student wrote the following hypothesis: 'The black-coloured flask will emit more infrared radiation than the silver-coloured flask during 10 minutes of cooling.' Describe a method to test this hypothesis.”
“The student wrote the following hypothesis: 'The black-coloured flask will emit more infrared radiation than the silver-coloured flask during 10 minutes of cooling.' Describe a method to test this hypothesis.”
What it’s really asking
It wants a method that would actually let you compare how much infrared a black flask and a silver flask emit while cooling, using either temperature change or an infrared detector, with a clear final comparison that tests the hypothesis rather than just describing an experiment in general terms.
What the sources actually showed — June 2023
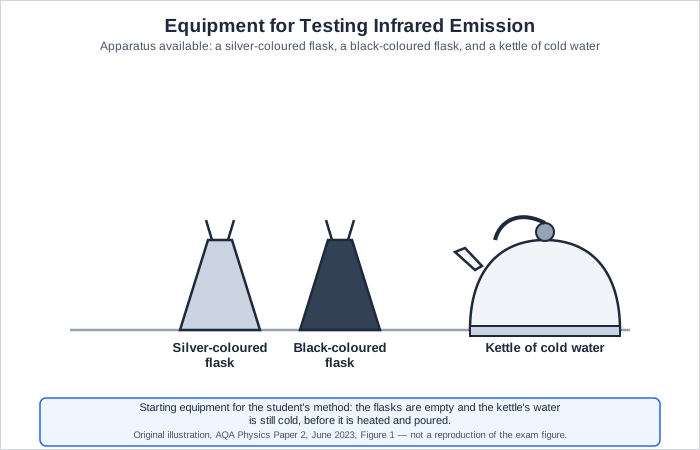
A drawing showing a silver-coloured flask, a black-coloured flask, and a kettle of cold water available as equipment.
The full worked answer — June 2023
I would heat water in the kettle, then pour an equal volume of the hot water into both the silver-coloured flask and the black-coloured flask at the same time. I would insert a thermometer into each flask and record the initial temperature of the water in both.
As soon as both thermometers are in place, I would start a stop clock. After exactly 10 minutes I would record the temperature in each flask again, then calculate the temperature decrease for each one over that time.
I would then compare the two temperature decreases: if the black flask has cooled by more than the silver flask, this supports the hypothesis that black surfaces emit more infrared radiation, since a bigger temperature drop means more thermal energy has left the flask as radiation in the same time.
Could you have written this? Every fact in this answer is drilled in our quizzes — the writing is the easy part once the evidence is automatic.
Practise core practical questionsWhat the mark scheme rewarded
- Using an equal volume of water at the same starting temperature in both flasks
- Recording the initial temperature in both flasks before timing begins
- Timing exactly 10 minutes, matching the hypothesis, before taking final readings
- A final comparison of the two temperature decreases that directly tests the hypothesis
- All objects emit infrared radiation, and the rate of emission depends on the surface's colour and texture
- A dull black surface is a better emitter, and a better absorber, of infrared radiation than a shiny silver surface
- An alternative valid method uses an infrared detector placed the same fixed distance from each flask instead of a thermometer
Traps examiners saw
- Describing a method but never actually comparing the two flasks' results against each other at the end
- Using different volumes or different starting temperatures of water in the two flasks, which breaks the fair test
- Forgetting to specify exactly 10 minutes, which is the time named in the hypothesis being tested
Full-mark self-check 0 of 4
The method for every Practical method — same every sittingMark bands, steps, timing
What this question type rewards
The topic changes by sitting — the mark scheme never does. Learn this once, then open your question above for that sitting’s sources and a full worked answer.
- All the key steps needed to actually produce a valid, repeatable result, not just a rough outline
- A logical sequence, so a stranger reading only your answer could follow it and get the same results
- Correctly identifying and measuring every variable the question asks about, including a full range of readings
The steps
- Read the question twice: what result is the method supposed to produce, and what apparatus have you already been given?
- List every piece of apparatus you would use and what each one measures
- Write your method as a numbered sequence, in the order a real student would actually carry it out
- Check you have covered how you get a RANGE of results, such as repeat readings or a range of angles, not just one measurement
- If a risk assessment is asked for, name one real hazard, the risk it creates, and a specific precaution, not just 'be careful'
According to the law of reflection, the angle of incidence is:
This question always asks for a complete, ordered method for a core practical, refraction, springs, or radiation. Practise writing methods as clear numbered steps rather than a paragraph.
Practise core practical questions“Determine the spring constant of the spring”
A 3 mark spring constant calculation using force equals spring constant times extension appears reliably, whether the spring is being stretched or compressed.
1×asked“Determine the spring constant of the spring. Use Figure 4.”
“Determine the spring constant of the spring. Use Figure 4.”
What it’s really asking
It wants you to read a genuine matching pair of force and extension values off the straight-line graph, then use force = spring constant times extension to calculate the spring constant in N/m.
What the sources actually showed — June 2021
A straight-line graph through the origin of force in newtons (up to 5.0 N) against extension in metres (up to 0.14 m), with data points at roughly 0.025 m intervals.
The full worked answer — June 2021
Reading from Figure 4, when the force is 5.00 N the extension is 0.125 m. Since force = spring constant multiplied by extension, the spring constant is 5.00 divided by 0.125.
5.00 divided by 0.125 gives a spring constant of 40 N/m.
Could you have written this? Every fact in this answer is drilled in our quizzes — the writing is the easy part once the evidence is automatic.
Practise Hooke's law calculationsWhat the mark scheme rewarded
- Reading a genuine matching pair of force and extension values from the graph
- Dividing force by extension to find the spring constant
- The correct final value, 40 N/m, with the correct unit
- Force = spring constant times extension is the equation linking these three quantities
- The spring constant is the gradient of a force against extension graph
- N/m is the correct unit for spring constant, since it is force per unit of extension
Traps examiners saw
- Reading extension in centimetres straight off the axis without converting to metres
- Dividing extension by force instead of force by extension
- Picking two points that are not actually on the straight line of best fit
Full-mark self-check 0 of 3
1×asked“Determine the spring constant of the spring. Use the Physics Equations Sheet.”
“Determine the spring constant of the spring. Use the Physics Equations Sheet.”
What it’s really asking
It wants you to work out the compression of the spring from the two lengths given, then use force = spring constant times extension (which applies to compression too) to calculate the spring constant.
What the sources actually showed — June 2022
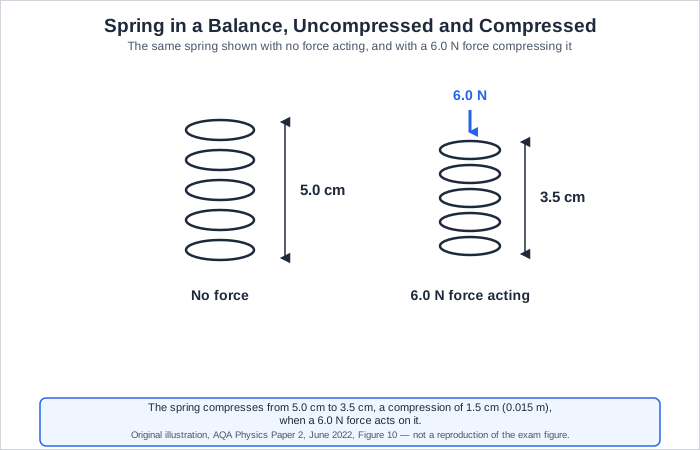
A diagram of the same spring drawn twice: with no force acting, its length is shown as 5.0 cm, and with a 6.0 N force compressing it, its length is shown as 3.5 cm.
The full worked answer — June 2022
The spring compresses from 5.0 cm to 3.5 cm, a compression of 1.5 cm, which is 0.015 m. A force of 6.0 N causes this compression, and since force = spring constant multiplied by extension, 6.0 = spring constant multiplied by 0.015.
Rearranging, the spring constant is 6.0 divided by 0.015, which gives 400 N/m.
Could you have written this? Every fact in this answer is drilled in our quizzes — the writing is the easy part once the evidence is automatic.
Practise Hooke's law calculationsWhat the mark scheme rewarded
- Correctly subtracting the two lengths to find the compression, 1.5 cm
- Converting the compression into metres before substituting
- The correct final value, 400 N/m
- The same equation, force = spring constant times extension, applies whether a spring is being stretched or compressed
- The compression is the difference between the natural length and the compressed length
- Always convert cm to m before substituting into a physics equation to avoid an answer that is a factor of 100 out
Traps examiners saw
- Using one of the two lengths, 5.0 cm or 3.5 cm, directly as the extension instead of subtracting them first
- Forgetting to convert the compression from cm to m before dividing
- Mixing up which length is the natural length and which is the compressed length
Full-mark self-check 0 of 3
The method for every Springs — same every sittingMark bands, steps, timing
What this question type rewards
The topic changes by sitting — the mark scheme never does. Learn this once, then open your question above for that sitting’s sources and a full worked answer.
- Correctly reading off or calculating a matching pair of force and extension values
- Rearranging the equation correctly before substituting numbers
- Giving a final answer with the correct unit, newtons per metre
The steps
- Identify the force and the extension (or compression), making sure both come from the same reading
- Check the extension is in metres, converting from centimetres if needed
- Rearrange force = spring constant times extension to make spring constant the subject
- Substitute and calculate, giving the unit N/m
What is a force?
This calculation always needs a genuine, matching pair of force and extension or compression values before you divide. Get the conversion to metres right every time.
Practise Hooke's law calculations“Explain how a safety feature reduces the risk of injury during a collision”
A 3 mark 'explain how a safety feature reduces injury' question recurs with an identical three point mark scheme: it always wants time, then rate of change of momentum, then force, argued in that order.
1×asked“The ice hockey players wear protective pads filled with foam. Explain how the protective pads help to reduce injury when the players collide.”
“The ice hockey players wear protective pads filled with foam. Explain how the protective pads help to reduce injury when the players collide.”
What it’s really asking
It wants the chain of reasoning from the foam padding increasing collision time, through to a smaller rate of change of momentum, through to a smaller force on the player.
What the sources actually showed — June 2020
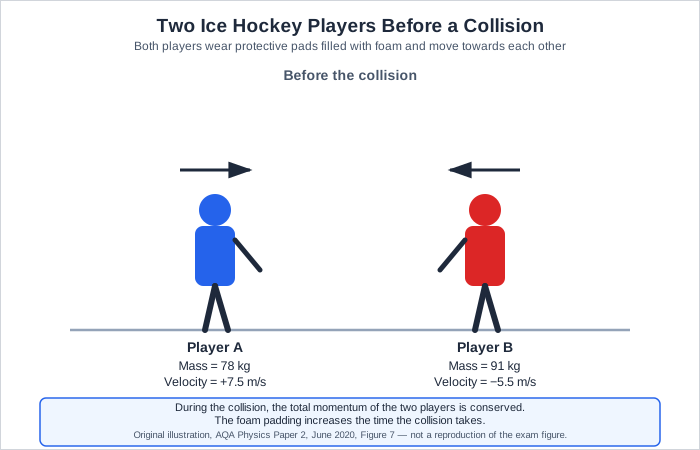
A diagram of two ice hockey players moving towards each other before a collision, with each player's mass and velocity labelled.
The full worked answer — June 2020
The foam in the protective pads compresses gradually during a collision, which increases the time taken for the players to stop moving relative to each other compared with a hard, rigid surface.
Since force equals the rate of change of momentum, and the players' change in momentum during the collision stays the same either way, increasing the time over which that change happens means the rate of change of momentum is smaller.
A smaller rate of change of momentum means a smaller force acts on the player during the collision, which reduces the risk of injury.
Could you have written this? Every fact in this answer is drilled in our quizzes — the writing is the easy part once the evidence is automatic.
Practise momentum and collision questionsWhat the mark scheme rewarded
- Stating that the padding increases the time taken to stop (during the collision)
- Linking this to a decreased rate of change of momentum
- Concluding that the force on the player is reduced
- Force equals the rate of change of momentum, or the change in momentum divided by the time taken
- Momentum equals mass times velocity
- A smaller force over a longer time can produce the same change in momentum as a larger force over a shorter time
Traps examiners saw
- Saying the padding 'slows down time' rather than increasing the time the collision itself takes
- Jumping straight from padding to 'less force' without explaining the rate of change of momentum link in between
- Confusing this with reducing momentum itself, when the padding does not change the momentum, only the force needed to stop it
Full-mark self-check 0 of 3
1×asked“The bumper car has a flexible bumper. Explain how the flexible bumper reduces the risk of injury to the people in the bumper car during the collision.”
“The bumper car has a flexible bumper. Explain how the flexible bumper reduces the risk of injury to the people in the bumper car during the collision.”
What it’s really asking
The same reasoning chain as the ice hockey pads: how a flexible material increases collision time, decreases the rate of change of momentum, and so decreases the force on the people inside.
What the sources actually showed — June 2023
A photograph of a fairground bumper car ride, with a bumper car, its flexible bumper, and the surrounding barrier labelled.
The full worked answer — June 2023
The flexible bumper deforms and squashes inward during the collision with the barrier, which increases the time taken for the collision to occur compared with a rigid metal bumper hitting the barrier directly.
Because the change in momentum of the car and its passengers during the collision is fixed by their mass and change in velocity, increasing the time over which that change happens means the rate of change of momentum decreases.
This lower rate of change of momentum means a smaller force acts on the people in the car during the collision, reducing the risk of injury.
Could you have written this? Every fact in this answer is drilled in our quizzes — the writing is the easy part once the evidence is automatic.
Practise momentum and collision questionsWhat the mark scheme rewarded
- Stating that the flexible bumper increases the time taken for the collision to occur
- Linking this to a decreased rate of change of momentum
- Concluding that the force on the people is reduced
- Force equals the rate of change of momentum, the change in momentum divided by the time taken
- A closed system means the total momentum before a collision equals the total momentum after it, if no external force acts
- Newton's third law means the force of the car on the barrier equals the force of the barrier on the car, in the opposite direction
Traps examiners saw
- Saying the flexible bumper 'absorbs the force' without explaining the time and rate of change of momentum reasoning behind it
- Not accepting 'slows down time' as equivalent to 'increases contact time'; AQA specifically does not accept this phrasing
- Forgetting that the change in momentum itself is the same either way; only the TIME over which it happens changes
Full-mark self-check 0 of 3
The method for every Collisions — same every sittingMark bands, steps, timing
What this question type rewards
The topic changes by sitting — the mark scheme never does. Learn this once, then open your question above for that sitting’s sources and a full worked answer.
- Explaining that the safety feature increases the TIME over which the collision happens
- Linking that increased time to a decrease in the rate of change of momentum
- Concluding that this means a smaller force acts on the people or object involved
The steps
- Identify the safety feature named in the question and what it is made from or how it behaves
- State that it increases the time taken for the collision or impact to happen
- Explain that force equals the rate of change of momentum, so a longer time means a smaller force
- Conclude explicitly that this reduces the risk of injury
Which equation links force, change in momentum and time?
This explanation always follows the same three step chain: more time, smaller rate of change of momentum, smaller force. Learn the chain once and it applies to any safety feature AQA names.
Practise momentum and collision questions“Describe the life cycle of stars much more massive than the Sun, or compare it with Sun-like stars”
A 6 mark extended question on the life cycle of stars appears reliably, though the exact number of level bands used in the mark scheme is not identical every sitting, so check the real structure for the year you are revising rather than assuming one fixed pattern.
1×asked“Some stars are much more massive than the Sun. Describe the life cycle of stars much more massive than the Sun, including the formation of new elements.”
“Some stars are much more massive than the Sun. Describe the life cycle of stars much more massive than the Sun, including the formation of new elements.”
What it’s really asking
It wants the full sequence for a massive star only, from nebula through to supernova, including how nuclear fusion inside the star builds up heavier elements as it ages.
The full worked answer — June 2020
A massive star begins as a nebula, a cloud of gas and dust made mostly of hydrogen, which is pulled together by gravity. As the cloud contracts, the temperature increases enough to form a protostar, and eventually hydrogen nuclei begin to fuse together to form helium nuclei, releasing energy and causing the star to become a stable main sequence star.
Once the hydrogen begins to run out, the star's helium nuclei start to fuse together to make heavier elements, up to iron, and the star expands to become a red super giant because a massive star's greater mass produces enough gravitational pull and temperature to drive this further fusion.
The star then collapses rapidly and explodes in a supernova, creating elements heavier than iron and distributing them throughout the universe, leaving behind either a neutron star or a black hole.
Could you have written this? Every fact in this answer is drilled in our quizzes — the writing is the easy part once the evidence is automatic.
Practise star life cycle questionsWhat the mark scheme rewarded
- Correctly naming each stage in the correct order: nebula, protostar, main sequence, red super giant, supernova
- Explaining fusion as the process building heavier elements, up to iron in the star itself and beyond iron in the supernova
- Naming the two possible remnants left behind, a neutron star or a black hole
- Fusion is the joining of small atomic nuclei to form larger ones, releasing energy
- A main sequence star is stable because the inward pull of gravity balances the outward pressure from fusion
- Elements heavier than iron can only be created in the extreme conditions of a supernova, not during a star's normal life
Traps examiners saw
- Describing the Sun's life cycle (white dwarf, black dwarf) by mistake instead of a massive star's
- Naming the stages but not explaining what causes the star to move from one to the next
- Forgetting to mention new elements being created, which the question specifically asks for
Full-mark self-check 0 of 4
1×asked“Compare the formation and life cycles of stars with a similar mass to the Sun to stars with a much greater mass than the Sun.”
“Compare the formation and life cycles of stars with a similar mass to the Sun to stars with a much greater mass than the Sun.”
What it’s really asking
It wants both a shared early stage that applies to all stars, and then a direct comparison of what happens differently to Sun-sized and much more massive stars later in their lives.
The full worked answer — June 2022
All stars form in the same way: a cloud of gas and dust called a nebula, mostly hydrogen, is pulled together by gravity to form a protostar. Fusion then begins, joining small nuclei into larger ones, hydrogen into helium, and the star becomes a stable main sequence star where gravitational forces pulling inwards balance the outward forces from fusion.
Once hydrogen runs out, a star with a similar mass to the Sun expands to become a red giant, while a star with a much greater mass expands to become a red super giant, a larger and more extreme version of the same expansion stage.
After that, a Sun-like star contracts and its temperature increases to become a white dwarf, eventually cooling to become a black dwarf, whereas a much more massive star explodes as a supernova, leaving behind either a neutron star or a black hole.
Could you have written this? Every fact in this answer is drilled in our quizzes — the writing is the easy part once the evidence is automatic.
Practise star life cycle questionsWhat the mark scheme rewarded
- Describing the shared early stages, nebula, protostar, main sequence, that apply to all stars
- Comparing the red giant stage against the red super giant stage
- Comparing the final stages, white dwarf then black dwarf against supernova then neutron star or black hole
- A main sequence star's stability comes from gravitational forces inward balancing fusion forces outward
- A white dwarf is a hot, dense remnant left after a Sun-like star sheds its outer layers
- A neutron star is an extremely dense remnant, and a black hole forms if the collapsing core is massive enough
Traps examiners saw
- Only describing one type of star's life cycle when the question specifically asks you to compare both
- Mixing up which star type ends as a white dwarf and which ends as a supernova
- Skipping the shared main sequence stage and jumping straight to where the two life cycles differ
Full-mark self-check 0 of 3
The method for every Stars — same every sittingMark bands, steps, timing
What this question type rewards
The topic changes by sitting — the mark scheme never does. Learn this once, then open your question above for that sitting’s sources and a full worked answer.
- Naming the correct stages of a star's life cycle in the correct order
- Explaining what causes the star to move from one stage to the next, not just naming the stages
- For comparison questions, giving the outcome for BOTH types of star at each matching stage, not describing only one
The steps
- Start at the nebula, a cloud of gas and dust pulled together by gravity
- Describe the protostar and main sequence stage, where fusion begins and the star becomes stable
- Describe what happens once hydrogen runs out, using the correct name for each following stage
- For a comparison question, state the different final stages for Sun-sized stars and much more massive stars separately
What is a protostar?
Learn the life cycle as a labelled sequence of named stages, then practise both describing one star type alone and comparing two star types side by side, since AQA asks it both ways.
Practise star life cycle questions“Use a diagram of galaxies to explain what it shows about redshift or the Big Bang theory”
A short 2 mark question asking you to read evidence about galaxies moving away from us, and connect it to red-shift or the Big Bang theory, appears in a genuinely comparable form across sittings, though the specific diagram and exact wording changes each time.
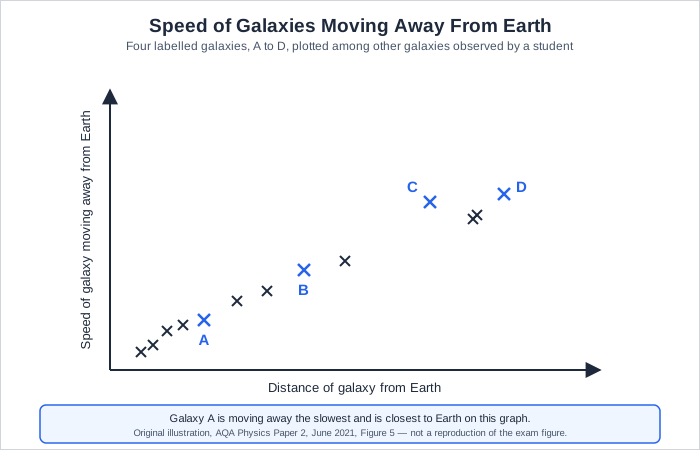
1×asked“Which galaxy would show the smallest observed change in the wavelength of visible light? Give a reason for your answer.”
“Which galaxy would show the smallest observed change in the wavelength of visible light? Give a reason for your answer.”
What it’s really asking
It wants you to identify which labelled point on the graph represents a galaxy moving away most slowly, or closest to Earth, and explain that this means its light has been redshifted the least.
What the sources actually showed — June 2021
A scatter graph of the speed of a galaxy moving away from Earth against the distance of the galaxy from Earth, with four labelled points, A, B, C and D, at different positions on the graph.
The full worked answer — June 2021
Galaxy A shows the smallest observed change in the wavelength of visible light, because on the graph it is the galaxy moving away from Earth the most slowly, or equivalently the closest galaxy to Earth.
Could you have written this? Every fact in this answer is drilled in our quizzes — the writing is the easy part once the evidence is automatic.
Practise red-shift and Big Bang questionsWhat the mark scheme rewarded
- Correctly identifying galaxy A from the graph
- A valid reason: that it is moving away the slowest, or that it is the closest to Earth
- Redshift is the increase in the observed wavelength of light from an object moving away from us
- The further away a galaxy is, the faster it appears to be moving away from Earth, and the greater its redshift
- This relationship between distance and speed is the key evidence for an expanding universe
Traps examiners saw
- Choosing the galaxy moving away the fastest by mistake, which would show the LARGEST wavelength change, not the smallest
- Giving a reason without stating which galaxy it applies to
Full-mark self-check 0 of 2
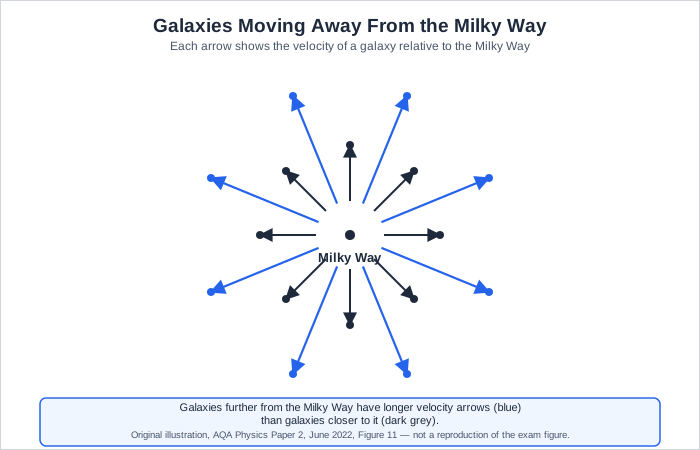
1×asked“Explain how Figure 11 provides evidence for the Big Bang theory.”
“Explain how Figure 11 provides evidence for the Big Bang theory.”
What it’s really asking
It wants you to read the pattern in the diagram, that the furthest galaxies are moving away the fastest, and explain what that pattern implies about a single starting point for the universe.
What the sources actually showed — June 2022
A diagram showing the Milky Way at the centre, surrounded by points representing other galaxies, each with an arrow showing its velocity relative to the Milky Way, with arrows further from the centre drawn longer than those closer in.
The full worked answer — June 2022
Figure 11 shows that the furthest galaxies from the Milky Way are moving away the fastest, since the arrows representing their velocity get longer the further out they are.
This suggests that at some point in the past, all of the galaxies and matter in the universe must have started out at the same point, before expanding outwards, which is the basis of the Big Bang theory.
Could you have written this? Every fact in this answer is drilled in our quizzes — the writing is the easy part once the evidence is automatic.
Practise red-shift and Big Bang questionsWhat the mark scheme rewarded
- Stating that the furthest galaxies are moving away the fastest
- Explaining that this suggests all galaxies and matter started at the same point in the past
- The Big Bang theory suggests the universe began from an extremely small, dense point and has been expanding ever since
- Redshift evidence, that more distant galaxies show a greater redshift, supports this expansion
- This is why the relationship between distance and speed matters: it points backwards to a single origin
Traps examiners saw
- Just describing that the galaxies are moving away without linking the pattern to a shared starting point
- Confusing this with evidence for the age of the universe rather than its origin
Full-mark self-check 0 of 2
The method for every Redshift — same every sittingMark bands, steps, timing
What this question type rewards
The topic changes by sitting — the mark scheme never does. Learn this once, then open your question above for that sitting’s sources and a full worked answer.
- Correctly reading the diagram or graph, distance, speed, or wavelength shift, rather than guessing
- Linking the reading directly to the scientific idea the question names, redshift or the Big Bang
The steps
- Identify what the diagram is actually showing: distance, speed, or a redshift measurement
- State the specific relationship shown, for example that greater distance means greater speed or a bigger redshift
- Connect that relationship to the scientific conclusion being asked for
The light from a distant galaxy is red-shifted. What does this tell us about the galaxy?
This question always wants two things: read the actual pattern in the diagram or graph, then say what that pattern implies about the universe's origin or expansion.
Practise red-shift and Big Bang questions“Complete the ray diagram to show how the image is formed by the lens”
A 3 mark ray diagram completion question recurs with an identical mark scheme structure: 2 marks for two correctly drawn construction lines, and 1 mark for the image itself, only awarded if the first two are correct.
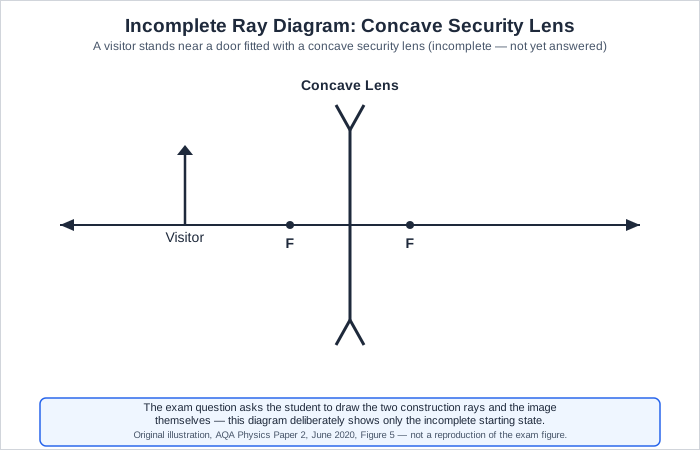
1×asked“Figure 5 is an incomplete ray diagram representing a visitor standing near the security lens. Complete Figure 5 to show how an image of the visitor is formed by the concave lens. Draw an arrow to represent the image.”
“Figure 5 is an incomplete ray diagram representing a visitor standing near the security lens. Complete Figure 5 to show how an image of the visitor is formed by the concave lens. Draw an arrow to represent the image.”
What it’s really asking
It wants two correctly constructed rays showing how a concave lens diverges light from an object, and the resulting virtual, upright, diminished image drawn in the correct place.
What the sources actually showed — June 2020
An incomplete ray diagram with a horizontal axis, a concave lens drawn as a vertical line at the centre, two focal points F marked either side of the lens, and an upward arrow labelled 'Visitor' drawn to the left of the lens.
The full worked answer — June 2020
I would draw a ray from the top of the visitor's arrow, travelling parallel to the axis until it reaches the lens, where it refracts and spreads outward as if it came from the near focal point on the same side as the visitor. I would draw a second ray from the top of the visitor straight through the centre of the lens without bending.
Tracing both diverging rays backwards to the left of the lens, they appear to meet at a point closer to the lens and lower than the visitor. I would draw the image as an upward arrow at this point, showing it as smaller than the visitor and on the same side of the lens.
Could you have written this? Every fact in this answer is drilled in our quizzes — the writing is the easy part once the evidence is automatic.
Practise lens ray diagramsWhat the mark scheme rewarded
- Any two correct construction lines from the top of the visitor, passing through the lens
- The image drawn at the correct position with the correct orientation, dependent on the first two marks
- A convex lens diagram instead of a concave one scores zero
- A concave lens is a diverging lens, always producing a virtual, upright, diminished image regardless of object distance
- A virtual image is formed where light rays appear to come from, not where they actually cross
Traps examiners saw
- Drawing the rays as if for a convex, converging lens, which the mark scheme specifically scores zero
- Drawing the image where the rays would meet if extended forwards, rather than tracing them backwards
- Forgetting that the image must be smaller than the object for a concave lens, not the same size or larger
Full-mark self-check 0 of 4
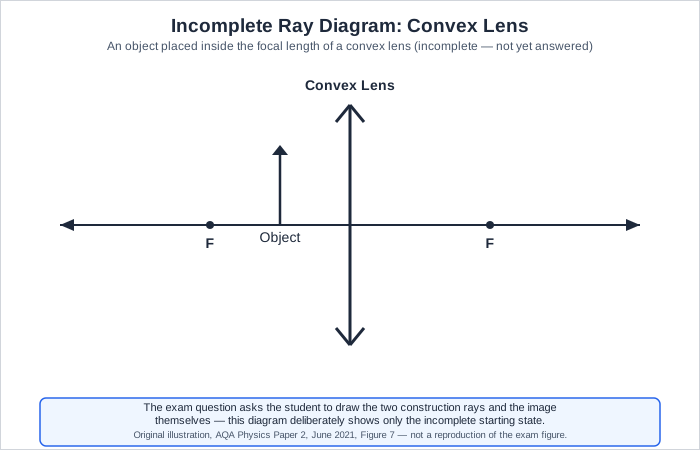
1×asked“Figure 7 shows an object near to a convex lens. Complete the ray diagram to show how the image is formed. Use an arrow to represent the image.”
“Figure 7 shows an object near to a convex lens. Complete the ray diagram to show how the image is formed. Use an arrow to represent the image.”
What it’s really asking
It wants two correctly constructed rays showing how a convex lens converges light, and the resulting virtual, upright, magnified image, since the object is placed inside the focal length.
What the sources actually showed — June 2021
An incomplete ray diagram with a horizontal axis, a convex lens drawn as a vertical line at the centre, two focal points F marked either side of the lens closer to the axis than the object's position, and an upward arrow labelled 'Object' drawn between the lens and the near focal point.
The full worked answer — June 2021
I would draw a ray from the top of the object, travelling parallel to the axis until it reaches the lens, where it refracts and passes through the far focal point. I would draw a second ray from the top of the object straight through the centre of the lens without bending.
Since the object is inside the focal length, these two rays are still diverging on the far side of the lens and never actually meet there, so I would trace both rays backwards on the same side as the object, to the point where they appear to meet, and draw the image as an upward arrow there, larger than the object.
Could you have written this? Every fact in this answer is drilled in our quizzes — the writing is the easy part once the evidence is automatic.
Practise lens ray diagramsWhat the mark scheme rewarded
- Any two correct construction lines from the top of the object, passing through the lens and traced backwards
- The image drawn in the correct position with the correct orientation, dependent on the first two marks
- A convex lens is a converging lens, but when the object is inside the focal length the rays diverge after the lens and must be traced backwards
- This produces a virtual, upright, magnified image, which is how a magnifying glass works
Traps examiners saw
- Extending the rays forwards past the lens and marking where they cross there, when the object is inside the focal length and they never actually cross on that side
- Drawing the image the same size as, or smaller than, the object when it should be magnified in this case
- Only getting 1 mark for two correct lines that are not traced backwards where required
Full-mark self-check 0 of 4
The method for every Lenses — same every sittingMark bands, steps, timing
What this question type rewards
The topic changes by sitting — the mark scheme never does. Learn this once, then open your question above for that sitting’s sources and a full worked answer.
- Drawing two correct construction lines from the top of the object, through the lens
- Placing the image at the correct position with the correct orientation, upright or inverted
The steps
- Draw a ray from the top of the object, parallel to the axis, then refracted through (or appearing to come from) the principal focus
- Draw a second ray from the top of the object straight through the centre of the lens, undeviated
- Mark where these two lines meet, or where they appear to meet if traced backwards, as the top of the image
- Draw the image as an arrow from the axis up to that point
What does a convex (converging) lens do to parallel rays of light?
Both construction lines have to be exactly right before the image mark can be awarded. Practise the parallel ray and the centre ray for both convex and concave lenses.
Practise lens ray diagrams“Give two ways in which two types of wave are different”
A short 2 mark question asking for two differences between two named types of wave recurs, always built around the same core distinction: transverse versus longitudinal.
1×asked“The car produces sound waves. Give two ways in which radio waves are different to sound waves.”
“The car produces sound waves. Give two ways in which radio waves are different to sound waves.”
What it’s really asking
It wants two genuine, distinct differences between an electromagnetic wave (radio waves) and a mechanical wave (sound), such as their type of oscillation, their speed, or whether they need a medium.
What the sources actually showed — June 2020
A drawing of a student operating a remote-controlled car, with the remote control and the car's aerial labelled.
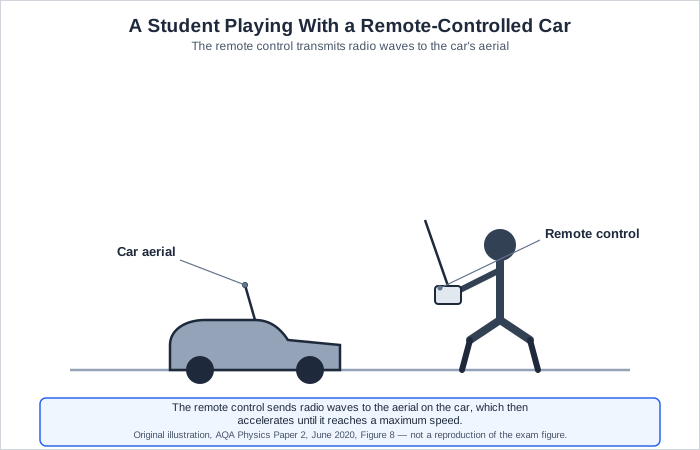
The full worked answer — June 2020
Radio waves are transverse waves, with their oscillations perpendicular to the direction they travel, whereas sound waves are longitudinal, with their oscillations parallel to the direction of travel.
Radio waves can also travel through a vacuum, since they do not need particles to carry their energy, while sound waves are mechanical waves and need a medium such as air to travel through.
Could you have written this? Every fact in this answer is drilled in our quizzes — the writing is the easy part once the evidence is automatic.
Practise wave property questionsWhat the mark scheme rewarded
- Any two from: radio waves are transverse (sound waves are longitudinal); radio waves travel at a higher speed; radio waves do not need a medium; radio waves are electromagnetic (sound waves are mechanical)
- Electromagnetic waves are transverse and travel at the speed of light, 3 times 10 to the power 8 m/s, through a vacuum
- Sound waves are longitudinal, mechanical waves that need particles of a medium to transfer energy
Traps examiners saw
- Giving two versions of the same point, for example 'transverse vs longitudinal' and 'oscillate differently', which are really only one point
- Confusing which type of wave is transverse and which is longitudinal
Full-mark self-check 0 of 2
1×asked“Electromagnetic waves are transverse. Some other types of wave are longitudinal. Describe the difference between transverse and longitudinal waves.”
“Electromagnetic waves are transverse. Some other types of wave are longitudinal. Describe the difference between transverse and longitudinal waves.”
What it’s really asking
It wants a precise definition of the direction of oscillation relative to the direction of energy transfer for each wave type, not just naming examples of each.
The full worked answer — June 2021
In a transverse wave, the oscillations, or vibrations, are perpendicular to the direction of energy transfer, meaning they move at right angles to the direction the wave is travelling.
In a longitudinal wave, the oscillations are parallel to the direction of energy transfer, meaning they move back and forth along the same direction the wave is travelling.
Could you have written this? Every fact in this answer is drilled in our quizzes — the writing is the easy part once the evidence is automatic.
Practise wave property questionsWhat the mark scheme rewarded
- In a transverse wave, oscillations are perpendicular to the direction of energy transfer
- In a longitudinal wave, oscillations are parallel to the direction of energy transfer
- All electromagnetic waves are transverse: radio, microwave, infrared, visible light, ultraviolet, X-ray, gamma
- Sound waves and the P-waves produced by earthquakes are examples of longitudinal waves
Traps examiners saw
- Giving examples of each wave type instead of describing the actual direction of oscillation
- Mixing up perpendicular and parallel between the two wave types
Full-mark self-check 0 of 2
The method for every Waves — same every sittingMark bands, steps, timing
What this question type rewards
The topic changes by sitting — the mark scheme never does. Learn this once, then open your question above for that sitting’s sources and a full worked answer.
- Two genuinely distinct, correct differences, not the same point stated twice
- Using the correct technical vocabulary, transverse, longitudinal, medium, vacuum
The steps
- Check whether each wave is transverse or longitudinal
- Check whether each wave needs a medium to travel through, or can travel through a vacuum
- Check their relative speeds if the question involves electromagnetic waves
What do waves transfer from one place to another?
This question always comes down to whether the oscillation is perpendicular or parallel to the direction of travel. Learn that one distinction precisely and you can answer it for any pair of waves AQA names.
Practise wave property questions“Explain why an object reaches a maximum speed or terminal velocity”
A 4 mark 'explain why an object stops accelerating' question recurs with an identical four point mark scheme, whether the object is a falling hailstone or an accelerating car.
1×asked“A hailstone falls from a cloud and accelerates. Why does the hailstone accelerate? The hailstone stops accelerating and reaches terminal velocity. Explain why the hailstone reaches terminal velocity.”
“A hailstone falls from a cloud and accelerates. Why does the hailstone accelerate? The hailstone stops accelerating and reaches terminal velocity. Explain why the hailstone reaches terminal velocity.”
What it’s really asking
It wants the full chain from an unbalanced force causing acceleration, through air resistance growing with speed, to the point where the forces balance and the hailstone stops accelerating.
What the sources actually showed — June 2022
A photograph of a handful of hailstones of different sizes.
The full worked answer — June 2022
The hailstone accelerates because there is a resultant force acting on it: initially, its weight is greater than the air resistance acting against its fall.
As the hailstone's velocity increases, the air resistance acting on it also increases, until the air resistance becomes equal in size to the hailstone's weight.
At this point, the resultant force on the hailstone is zero, so it stops accelerating and falls at a constant maximum speed, called terminal velocity.
Could you have written this? Every fact in this answer is drilled in our quizzes — the writing is the easy part once the evidence is automatic.
Practise terminal velocity questionsWhat the mark scheme rewarded
- Stating there is a resultant force acting initially, causing acceleration
- Stating that air resistance increases as velocity increases
- Stating that this continues until air resistance equals the hailstone's weight
- Concluding the resultant force is then zero
- Terminal velocity is the constant maximum speed reached when the resultant force on a falling object becomes zero
- Air resistance increases with speed because a faster-moving object collides with more air particles per second
- Weight equals mass times gravitational field strength, and stays constant throughout the fall
Traps examiners saw
- Saying air resistance 'becomes greater than' weight, which would cause deceleration, not a constant terminal velocity
- Forgetting to state the specific tipping point, that the two forces become equal
- Not explaining WHY the hailstone accelerates in the first place before explaining terminal velocity
Full-mark self-check 0 of 4
1×asked“A different car accelerated from 0.12 m/s to 0.52 m/s. Explain why the car has a maximum speed.”
“A different car accelerated from 0.12 m/s to 0.52 m/s. Explain why the car has a maximum speed.”
What it’s really asking
The same terminal velocity reasoning chain applied to a car's driving force and air resistance instead of a falling object's weight and air resistance.
What the sources actually showed — June 2020
A drawing of a remote-controlled car with a labelled aerial, used earlier in the question to introduce the car.
The full worked answer — June 2020
The car has a maximum forward force, provided by its motor, which is what allows it to accelerate in the first place.
As the speed of the car increases, the air resistance acting against it also increases, until the air resistance becomes equal in size to the forward force from the motor.
At this point, the forces are balanced and the resultant force on the car is zero, so the car can no longer accelerate and instead travels at a constant maximum speed.
Could you have written this? Every fact in this answer is drilled in our quizzes — the writing is the easy part once the evidence is automatic.
Practise terminal velocity questionsWhat the mark scheme rewarded
- Stating there is a maximum forward force provided by the motor
- Stating that air resistance increases as the car's speed increases
- Stating that this continues until air resistance equals the forward force
- Concluding the car can no longer accelerate once forces are balanced
- A vehicle's engine or motor can only provide a limited maximum driving force
- Air resistance, or drag, increases with speed for any moving vehicle
- A resultant force of zero means an object continues at constant velocity, not that it stops moving
Traps examiners saw
- Saying the car 'runs out of force' rather than explaining that air resistance grows to match a fixed maximum forward force
- Forgetting that a resultant force of zero means constant speed, not that the car stops
Full-mark self-check 0 of 4
The method for every Terminal velocity — same every sittingMark bands, steps, timing
What this question type rewards
The topic changes by sitting — the mark scheme never does. Learn this once, then open your question above for that sitting’s sources and a full worked answer.
- Identifying the resistive force, air resistance or friction, and stating that it increases as speed increases
- Stating the point at which the resistive force becomes equal to the driving force or weight
- Concluding that the resultant force is then zero, so the object stops accelerating
The steps
- Name the two opposing forces acting on the object as it speeds up
- State that the resistive force increases as speed increases
- State the point at which the two forces become equal
- Conclude that the resultant force is zero, so the object moves at a constant, maximum speed
An object reaches terminal velocity when falling through air. Which statement correctly describes the forces at terminal velocity?
This explanation always follows the same four step chain, whatever the object: a driving force, a resistive force that grows with speed, the point they balance, and a zero resultant force.
Practise terminal velocity questions“Calculate the number of turns or the output potential difference of a transformer”
A 3 mark calculation using the transformer equation, potential difference across the primary coil divided by potential difference across the secondary coil equals the number of turns on the primary divided by the number of turns on the secondary, recurs reliably.
1×asked“The lamp requires an input potential difference of 5.0 V. The alternator generates a potential difference of 1.5 V. The primary coil of the transformer has 150 turns. Calculate the number of turns needed on the secondary coil.”
“The lamp requires an input potential difference of 5.0 V. The alternator generates a potential difference of 1.5 V. The primary coil of the transformer has 150 turns. Calculate the number of turns needed on the secondary coil.”
What it’s really asking
It wants the transformer equation rearranged to find the number of secondary turns, using the potential differences and the known primary turns.
What the sources actually showed — June 2020
A drawing of a portable power supply, consisting of a hand-cranked alternator connected to a transformer, with a handle labelled.
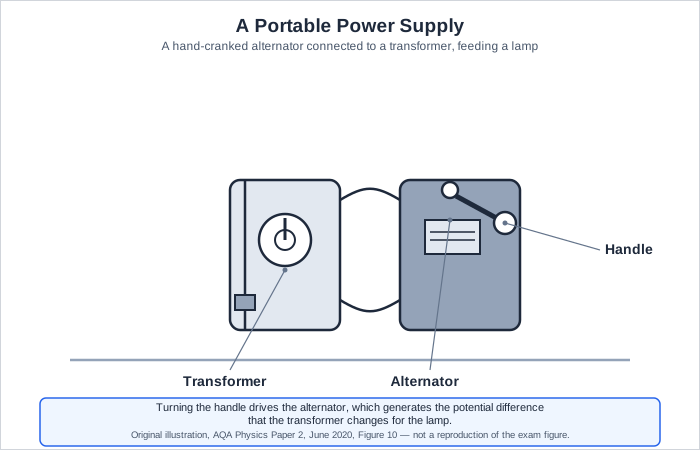
The full worked answer — June 2020
Using the transformer equation, primary pd over secondary pd equals primary turns over secondary turns, I can write 1.5 divided by 5.0 equals 150 divided by the number of secondary turns.
Rearranging, the number of secondary turns equals 150 divided by 0.3, which gives 500 turns.
Could you have written this? Every fact in this answer is drilled in our quizzes — the writing is the easy part once the evidence is automatic.
Practise transformer calculationsWhat the mark scheme rewarded
- Setting up 1.5 / 5.0 = 150 / Ns correctly
- Rearranging to Ns = 150 / 0.3
- The correct final answer, 500 turns
- The transformer equation relates the ratio of potential differences to the ratio of turns on the two coils
- A step-up transformer has more turns on the secondary coil than the primary, increasing the potential difference
Traps examiners saw
- Putting the primary and secondary values on the wrong sides of the equation
- Forgetting the number of turns must be a whole number, and rounding sensibly
Full-mark self-check 0 of 3
1×asked“There is an alternating input potential difference of 230 V. Determine the output potential difference.”
“There is an alternating input potential difference of 230 V. Determine the output potential difference.”
What it’s really asking
It wants the transformer equation rearranged to find the output (secondary) potential difference, using the given input voltage and the number of turns on each coil.
What the sources actually showed — June 2022
A diagram of a transformer with an input pd labelled at a primary coil of 200 turns, wound around an iron core, and an output pd labelled at a secondary coil of 1200 turns.
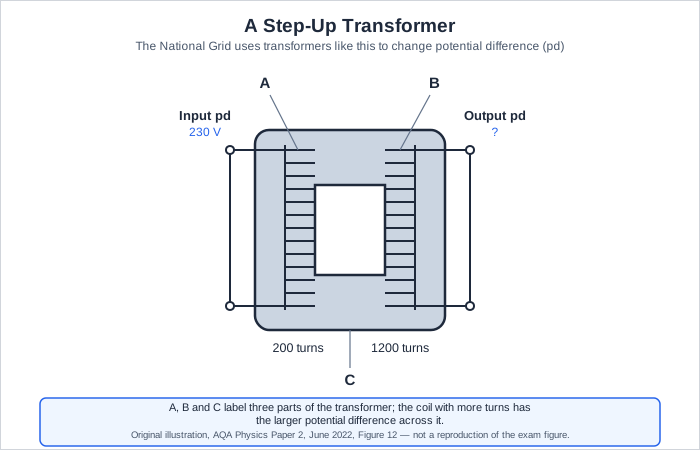
The full worked answer — June 2022
Using the transformer equation, 230 divided by the output pd equals 200 divided by 1200, since the primary coil has 200 turns and the secondary coil has 1200 turns.
Rearranging, the output pd equals 1200 multiplied by 230, all divided by 200, which gives 1380 V.
Could you have written this? Every fact in this answer is drilled in our quizzes — the writing is the easy part once the evidence is automatic.
Practise transformer calculationsWhat the mark scheme rewarded
- Setting up 230 / Vs = 200 / 1200 correctly
- Rearranging to Vs = (1200 x 230) / 200
- The correct final answer, 1380 V
- More turns on the secondary coil than the primary makes a step-up transformer, increasing the potential difference
- The National Grid uses step-up transformers to raise potential difference for efficient transmission, and step-down transformers to lower it again for safe use
Traps examiners saw
- Inverting the ratio and getting a lower output pd, when the secondary has clearly more turns and should give a higher output
- Forgetting to check whether the answer makes sense given the turns ratio, since 1380 V being bigger than 230 V is exactly what more secondary turns predicts
Full-mark self-check 0 of 3
The method for every Transformers — same every sittingMark bands, steps, timing
What this question type rewards
The topic changes by sitting — the mark scheme never does. Learn this once, then open your question above for that sitting’s sources and a full worked answer.
- Correctly setting up the transformer equation with the right values in the right places
- Rearranging it correctly to find whichever quantity is missing
- The correct final answer with the correct unit, volts or a whole number of turns
The steps
- Write down the transformer equation: primary pd over secondary pd equals primary turns over secondary turns
- Substitute the three known values into the correct places
- Rearrange to make the unknown the subject
- Calculate the final answer, checking the unit makes sense
What is the function of a step-up transformer in the National Grid?
This calculation is always the same equation rearranged to find a different missing value. Practise setting it up correctly with the primary and secondary values in the right place every time.
Practise transformer calculations“Calculate the density of a fluid from the pressure and force acting on a submerged object”
This 6 mark, multi-step calculation combines pressure equals force over area with pressure equals height times density times gravitational field strength. We have one full, real sitting for this exact combined calculation; we will add further sittings as more papers become public.
1×asked“When the brick from Figure 14 is at the bottom of the pool, the top surface of the brick is 2.50 m below the surface of the water. The force acting on the top surface of the brick due to the weight of the water is 637 N. Calculate the density of the water in the swimming pool.”
“When the brick from Figure 14 is at the bottom of the pool, the top surface of the brick is 2.50 m below the surface of the water. The force acting on the top surface of the brick due to the weight of the water is 637 N. Calculate the density of the water in the swimming pool.”
What it’s really asking
It wants you to first find the pressure on the brick's top surface using force over area, and then use that pressure with the depth and gravitational field strength to calculate the water's density.
What the sources actually showed — June 2022
A labelled diagram of a rectangular diving brick, 25 cm long, 10 cm wide, and 10 cm high, used for swimming pool diving practice.
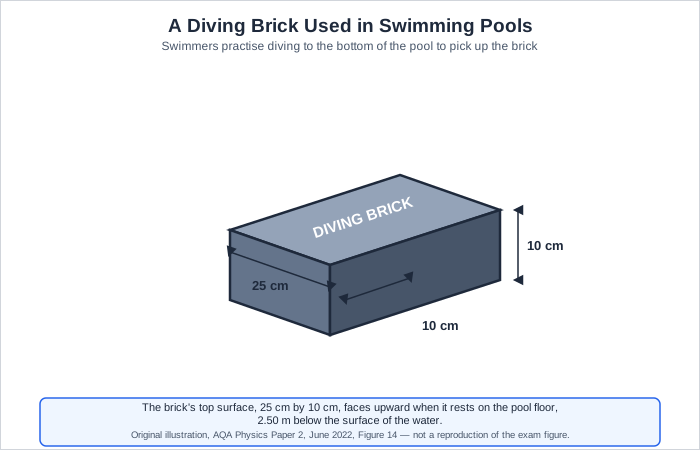
The full worked answer — June 2022
The top surface of the brick measures 0.25 m by 0.10 m, giving an area of 0.25 multiplied by 0.10, which is 0.025 m squared. Using pressure equals force divided by area, the pressure on the top surface is 637 divided by 0.025, which is 25480 Pa.
Pressure due to a fluid equals height multiplied by density multiplied by gravitational field strength, so 25480 equals 2.5 multiplied by density multiplied by 9.8.
Rearranging, density equals 25480 divided by the product of 9.8 and 2.5, which gives a density of 1040 kg/m cubed.
Could you have written this? Every fact in this answer is drilled in our quizzes — the writing is the easy part once the evidence is automatic.
Practise pressure in fluids calculationsWhat the mark scheme rewarded
- Calculating the area of the top surface correctly, in m squared
- Using pressure = force / area to find 25480 Pa
- Substituting correctly into pressure = height x density x gravitational field strength
- Rearranging and calculating the correct final density, 1040 kg/m cubed
- Pressure = force / area applies to the force pushing on any surface, including a submerged object
- Pressure due to a column of fluid = height x density x gravitational field strength
- Water's density is usually around 1000 kg/m cubed, so 1040 kg/m cubed is a sensible answer for pool water
Traps examiners saw
- Forgetting to convert the brick's dimensions from centimetres to metres before calculating the area
- Mixing up which equation to use first: area and pressure from force must come before density from the fluid pressure equation
- Substituting the depth or the pressure into the wrong position in the second equation
Full-mark self-check 0 of 4
The method for every Pressure — same every sittingMark bands, steps, timing
What this question type rewards
The topic changes by sitting — the mark scheme never does. Learn this once, then open your question above for that sitting’s sources and a full worked answer.
- Calculating the area of the surface the force acts on
- Using pressure = force / area to find the pressure
- Using pressure = height x density x gravitational field strength, rearranged to find density
The steps
- Calculate the area of the relevant surface from the given dimensions
- Use pressure = force / area to find the pressure at that depth
- Rearrange pressure = height x density x gravitational field strength to make density the subject
- Substitute the depth, the pressure just calculated, and gravitational field strength to find density
What is the correct equation for pressure?
This calculation always has two stages: pressure from force and area first, then density from the fluid pressure equation. Do them in that order and keep your units in metres throughout.
Practise pressure in fluids calculationsThe question types that keep coming back
Across the 4 sittings we have full papers for, these are the recurring question archetypes worth the most marks in Paper 2.
Not covered on this page yet
Moments and levers as a standalone extended calculation · Momentum conservation calculations across a full collision · Electromagnetic induction and the dynamo effect · Sound wave properties and the human hearing range
This page focuses on question types with a genuinely comparable, real structure across two or more sittings, or a single strong recent example. Many other topics on the specification, moments, momentum conservation calculations, electromagnetic induction, sound waves, and the full electromagnetic spectrum, appear elsewhere on the paper but are not yet covered here in this recurring-structure format.
Before you revise
Are these real mark-scheme answers?
The diagrams and data are described in our own words, not reproduced, and the worked answers are written entirely by us, aimed at the top of the real AQA mark schemes for each sitting. They are not copied from AQA's own exemplar materials, since that would breach copyright, but they are built to hit exactly what the real mark scheme rewarded that year. PrepWise is independent of AQA and not endorsed by them.
Will the exact same questions come up again this year?
The numbers and specific context will change every year, a different mass, a different colour, a different distance. But the question TYPE, and the mark scheme structure behind it, repeats reliably for some of the questions on this page, the 6 mark practical method question above all. Learn the pattern of steps behind each archetype, not just one year's numbers.
Why do some of the star life cycle mark schemes use a different number of levels?
AQA does not always use exactly the same number of bands for a level-of-response question every year, even on the same broad topic. One sitting used a 3-band scheme and another used a 2-band scheme for questions on this exact topic. Always check how many levels the actual question in front of you uses rather than assuming it matches a previous year.
Is PrepWise free to use for this?
Yes, PrepWise is free now. You can practise every topic on this page without paying anything.
Stop guessing, start practising the actual question types
Every topic on this page has practice questions waiting in the app, scored the way AQA actually marks them.
Start revising free