Test yourself on Cell Biology Practical Investigations with exam style questions, marked instantly.
Flashcards that come back just before you would forget them.
A revision plan that remembers what you know and shows what to do next.
See which topics you have nailed and which need another look.
Quiz yourself on Cell Biology Practical InvestigationsGet your flashcardsBuild my revision planTrack my progressThe Detective Work of Biology
Every great biological discovery started with careful observation and experimentation. When Robert Hooke first observed cells in cork using his primitive microscope in 1665, he was doing exactly what you'll learn in these practicals - using scientific methods to unlock the secrets of life.
The three Required Practicals in Cell Biology will give you the essential skills every biologist needs: precise observation, controlled experimentation, and critical analysis of results.
Required Practical 1: Light Microscopy
Equipment and Setup
- Light microscope with x4, x10, x40 objective lenses
- Prepared slides (plant cells, animal cells)
- Glass slides and coverslips
- Mounting medium or water
- Ruler or stage micrometer
Method
- Place slide on stage and secure with clips
- Start with lowest magnification (x4 objective)
- Use coarse focus to get approximate focus
- Switch to higher magnifications and use fine focus
- Observe and draw cells, noting key features
- Measure cells using stage micrometer
Microscopy Calculations
Magnification = Image Size ÷ Actual Size
Image Size = Magnification × Actual Size
Actual Size = Image Size ÷ Magnification
Drawing Guidelines
- Use pencil and draw clear, continuous lines
- Draw what you see, not what you know should be there
- Include scale and magnification
- Label clearly with straight lines
- No shading or sketchy lines
Magnification Calculations: Worked Examples
The MIR Triangle: Write I on top, M and R side by side on the bottom.
Cover the value you want to find: I = M x R | M = I / R | R = I / M
(M = Magnification, I = Image size, R = Real size)
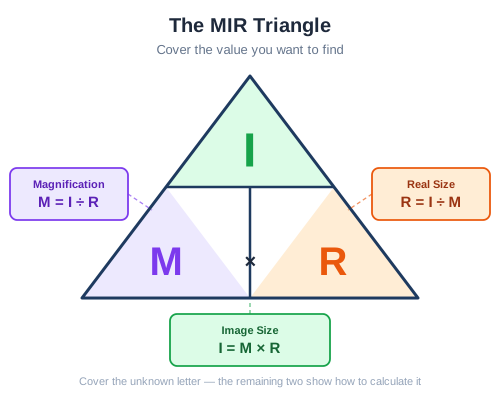
The magnification formula triangle — cover what you want to find
Example 1: Finding Real Size
A cell measures 30 mm on a photograph taken at x400 magnification. What is the actual size of the cell?
- Write the formula: Real size = Image size ÷ Magnification
- Substitute values: Real size = 30 mm ÷ 400
- Calculate: Real size = 0.075 mm
- Convert to micrometres: 0.075 mm × 1000 = 75 micrometres (75 µm)
Why convert? Most cells are measured in micrometres (µm). 1 mm = 1000 µm.
Example 2: Finding Magnification
A red blood cell has an actual diameter of 8 µm. In a diagram it measures 24 mm. What is the magnification?
- Make units match: Convert 24 mm to µm: 24 mm × 1000 = 24,000 µm
- Write the formula: Magnification = Image size ÷ Real size
- Substitute values: Magnification = 24,000 µm ÷ 8 µm
- Calculate: Magnification = x3000
Key rule: Both values MUST be in the same units before dividing.
Quick Check: A cell image measures 45 mm under a microscope at x300 magnification. What is the actual size in micrometres?
Real size = Image size ÷ Magnification = 45 mm ÷ 300 = 0.15 mm. Convert to µm: 0.15 × 1000 = 150 µm. The actual size of the cell is 150 micrometres.
Required Practical 2: Observing Mitosis
Equipment
- Garlic or onion root tips
- 1M hydrochloric acid
- Toluidine blue stain
- Glass slides and coverslips
- Mounted needles
- Water bath at 60°C
Method
- Cut 5mm from growing root tips
- Place in 1M HCl at 60°C for 5 minutes
- Wash root tips in cold water
- Place on slide with toluidine blue stain
- Cover with coverslip and tap gently to spread cells
- Observe under microscope at x400 magnification
- Identify different stages of mitosis
Safety Considerations
- Wear safety goggles when using HCl
- Use water bath safely - avoid burns
- Handle glass slides carefully
- Dispose of biological material appropriately
Expected Observations
- Interphase cells (most common) - nucleus visible
- Prophase - chromosomes condensing
- Metaphase - chromosomes aligned at equator
- Anaphase - chromosomes moving to poles
- Telophase - new nuclei forming
Required Practical 3: Investigating Osmosis
Equipment
- Potato tubers (5-6 large potatoes)
- Cork borer (10mm diameter)
- Ruler
- Balance (±0.01g)
- Sucrose solutions (0.0, 0.2, 0.4, 0.6, 0.8, 1.0 mol dm⁻³)
- Beakers
- Paper towels
Method
- Cut potato cylinders using cork borer
- Trim to exactly 30mm length
- Weigh each cylinder and record mass
- Place in different concentrations of sucrose solution
- Leave for 30 minutes
- Remove, pat dry, and reweigh
- Calculate percentage change in mass
- Plot graph and find isotonic point
Variables
- Independent variable: Sucrose concentration
- Dependent variable: Change in mass of potato
- Control variables: Temperature, time, potato type, cylinder size
Calculations
Percentage change in mass = ((Final mass - Initial mass) ÷ Initial mass) × 100
Required Practical: Food Tests (Benedict's, Biuret, Iodine)

What each test detects
- Benedict's reagent — tests for reducing sugars (e.g. glucose). Heat the sample with Benedict's in a water bath. Positive result: blue → brick red. Negative: stays blue.
- Biuret reagent — tests for proteins. Add biuret to sample, no heating. Positive result: pale blue → purple/lilac. Negative: stays blue.
- Iodine solution — tests for starch. Add iodine to sample, no heating. Positive result: yellow-brown → blue-black. Negative: stays yellow-brown.
Exam tip
When asked to identify an unknown food, perform all three tests on separate samples. Examiners often give a food that contains MORE than one nutrient — students who only do one test miss marks. Also note the heating step: only Benedict's requires a water bath. Forgetting to heat Benedict's (or wrongly heating biuret/iodine) is a common mark-losing error.
Advanced Practical Considerations
Statistical Analysis
- Mean: Sum of values ÷ number of values
- Range: Highest value - lowest value
- Anomalies: Results that don't fit the pattern
- Reliability: Consistent results from repeats
- Validity: Results answer the original question
Experimental Design Principles
- Fair testing: Only one variable changes
- Controls: Negative and positive controls where appropriate
- Sample size: Sufficient repeats for reliable data
- Precision: Appropriate measuring instruments
- Accuracy: Measurements close to true value
Links to Other Topics
- Topic 1 (Cells): Cell structure observed in microscopy
- Topic 2 (Microscopy): Calculation skills applied
- Topic 3 (Transport): Osmosis theory tested practically
- Topic 4 (Organisation): Different cell types observed
Quick Check: A student observes cells at x100 magnification and then switches to x400. What happens to the field of view and why might they still prefer x100 for some observations?
At higher magnification, the field of view becomes smaller — you can see individual cells in more detail but fewer cells overall. A student might prefer x100 because it allows them to see the arrangement of many cells and identify areas of interest before zooming in. For counting cells in mitosis stages, a medium magnification allows viewing more cells at once, giving more reliable data. Always start at the lowest magnification and work up.
Microscope Setup and Cell Observations

Proper microscope setup and focusing technique for cell observation
| Magnification | Field of View | Detail Level | Best For |
|---|---|---|---|
| x40 (4x objective) | Large | Overview | Finding cells, general structure |
| x100 (10x objective) | Medium | Good detail | Cell shape, basic organelles |
| x400 (40x objective) | Small | High detail | Organelles, mitosis stages |
Osmosis Results and Analysis
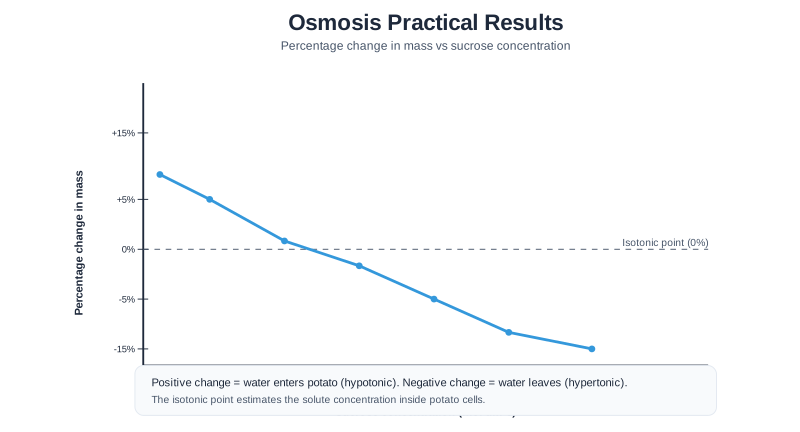
Typical results showing relationship between sucrose concentration and percentage change in mass
Interpreting Results
- Positive percentage change: Water moved into potato — the external solution was more dilute (higher water concentration) than the potato cells
- Negative percentage change: Water moved out of potato — the external solution was more concentrated (lower water concentration) than the potato cells
- Zero percentage change: The solution and potato cells had equal concentrations — no net movement of water
- Finding the equal point: Read from the graph where the line crosses the x-axis — this tells you the concentration of solutes inside the potato cells
Quick Check: A student uses iodine solution to stain an onion cell slide. What colour would you expect the cell wall region to appear, and why does staining help?
The cell wall (and any starch present) would appear dark blue-black after iodine staining. Staining is necessary because cell structures are mostly colourless and transparent without dye — they would be almost invisible under the microscope. The iodine binds to the cell wall components, adding contrast so the structure can be clearly observed and drawn.
Why Do We Use Stains?
Under a light microscope, most cell structures appear almost completely transparent and colourless. Without staining, you would look at a glass slide and see very little — the cell contents blend into the surrounding water or mounting medium.
Stains work by binding to specific chemical structures within cells, adding contrast so those structures become visible. Different stains are selective — they bind to different types of molecules:
- Iodine solution binds to starch and reacts with cell wall components, turning them dark blue-black. It is ideal for staining plant cells (e.g., onion epidermis) because it reveals the cell wall, cytoplasm, and nucleus clearly.
- Methylene blue binds to nucleic acids (DNA and RNA), which are acidic molecules. It stains the nucleus a deep blue colour, making it clearly visible in animal cells such as cheek cells, where the cell wall is absent.
- Toluidine blue (used in the mitosis practical) stains chromosomes, making stages of mitosis easier to identify.
It is important to understand that stains do not magnify structures — they only add colour. Resolution and magnification are separate concepts determined by the quality of the microscope lenses, not the stain used.
Key Terms for Practical Investigations
- Magnification
- How many times larger an image appears compared to the actual object. Calculated as: Image size divided by Real size.
- Resolution
- The ability to distinguish between two points that are close together. A high-resolution image shows fine detail clearly; a low-resolution image appears blurry even when magnified.
- Staining
- Adding a coloured dye to a prepared slide to make cell structures visible. Most cell structures are colourless and transparent without staining.
- Iodine solution
- A stain that turns starch (and some cell walls) dark blue-black. Commonly used to stain plant cells and make the cell wall visible.
- Methylene blue
- A stain that colours nuclei and other acidic cell components blue. Commonly used to stain animal cells (e.g., cheek cells) to make the nucleus visible.
- Eyepiece graticule
- A scale built into the eyepiece of the microscope. Used to measure the size of cells. Must be calibrated against a stage micrometer before use.
- Stage micrometer
- A microscope slide with a precise scale engraved on it, used to calibrate the eyepiece graticule.
- Real size (actual size)
- The true size of the object being observed. Calculated as: Image size divided by Magnification.
- Image size
- The size of the object as it appears under the microscope (or in a photograph). Calculated as: Magnification multiplied by Real size.
Must Memorise: Magnification formula — Magnification = Image size / Real size (rearrange as needed using the MIR triangle). Resolution is about CLARITY not size — a high-magnification blurry image has low resolution.
Cell Biology Required Practicals
Using a light microscope to observe, draw and label cells
Preparing a slide to observe mitosis in root tip cells
Investigating osmosis in plant tissue
Microscopy, slide preparation, data analysis, evaluation
Common Misconceptions in Microscopy
Misconception 1: "Higher magnification always gives a better image"
The reality: Magnification and resolution are completely different properties. Magnification tells you how much larger the image appears. Resolution tells you how much detail you can see clearly. If a microscope has poor resolution, increasing the magnification only makes the blurry image bigger — you still cannot distinguish individual structures. A high-quality x400 image can show far more useful detail than a poor-quality x1000 image.
Misconception 2: "The magnification formula only works one way"
The reality: The formula Magnification = Image size ÷ Real size can be rearranged to find any of the three values. Use the MIR triangle: cover the value you need to find and perform the operation shown. You can find Real size (I ÷ M), Image size (M × R), or Magnification (I ÷ R). Exam questions frequently ask you to rearrange — always show your working and check your units match.
Misconception 3: "Electron microscopes are better simply because they magnify more"
The reality: The key advantage of electron microscopes over light microscopes is their far superior resolution, not just their magnification. Electron microscopes use beams of electrons instead of light. Because electrons have a much shorter wavelength than visible light, they can resolve (distinguish) structures that are much closer together. This is why electron microscopes can reveal internal organelle structures like cristae in mitochondria, which are completely invisible under a light microscope.
Memory Aid: The MIR Triangle
Draw this triangle and memorise it — it appears in almost every biology paper:
        [ I ]
       [M x R]
Write I (Image size) in the top half of the triangle, and M (Magnification) and R (Real size) side by side in the bottom half.
- Cover I → Image size = M × R
- Cover M → Magnification = I ÷ R
- Cover R → Real size = I ÷ M
Unit conversion reminder:
"Milli to Micro — times by 1000" (1 mm = 1000 µm)
"Micro to Milli — divide by 1000" (1000 µm = 1 mm)
Stain colours mnemonic:
- Iodine = dark blue-Inky black (stains starch and cell walls)
- Methylene blue = blue nucleus (Makes the nucleus visible)
Electron Microscopy Higher
Light microscopes are limited by the wavelength of visible light, which means they cannot resolve (distinguish) structures smaller than about 200 nanometres. This is why many organelles, such as ribosomes and the detailed inner membrane structure of mitochondria, cannot be seen under a light microscope.
Electron microscopes use beams of electrons instead of light. Electrons have a much shorter wavelength, giving electron microscopes far higher resolution — around 0.2 nanometres.
There are two main types:
- Transmission Electron Microscope (TEM): Electrons pass through a very thin slice of the specimen, producing a 2D image of internal structures. Shows great detail of organelles inside cells.
- Scanning Electron Microscope (SEM): Electrons bounce off the surface of the specimen, producing a detailed 3D image of the external surface. Used to study cell surface features and tissue structure.
Key limitation: Specimens must be dead and viewed in a vacuum — living cells cannot be observed. Preparation can also introduce artefacts (false structures from the preparation process).
Exam Focus: Magnification Calculations
Magnification calculations appear in nearly every biology paper — they are worth 2-3 marks and are a reliable source of easy marks if you follow the method correctly.
Step-by-step method (always write every step for full marks):
- Write the formula you are using
- Check units are the same (convert if needed — 1 mm = 1000 µm)
- Substitute values and calculate
- State the unit in your answer
Most common unit conversion mistake: Students forget to convert mm to µm before dividing. If the image is measured in mm and the actual size is given in µm, multiply the mm value by 1000 before dividing.
For quality of evidence (QoE) marks: When evaluating a microscopy practical, always comment on: resolution, magnification appropriate for what you are trying to observe, stain choice, number of repeats, and sources of error (e.g., inconsistent staining, parallax when measuring).
📝 Practical Skills and Exam Tips
Common Errors to Avoid
- Microscopy: Always start with lowest magnification (x4), then increase. Use coarse then fine focus
- Osmosis practical: Use a cork borer for uniform cylinders, pat dry before weighing, use a timer for precise intervals
- Control variables: Temperature must be controlled — state this explicitly in your method
Data Analysis
- Calculate means: Always use at least 3 repeats and ignore anomalies
- Percentage change: (final - initial) / initial x 100 — always use the formula
- Draw conclusions: Link results to biological theory (osmosis, diffusion)
Exam Technique
- Know the methods well enough to suggest modifications and improvements
- Understand WHY each step is necessary — not just what you do
- Be able to calculate magnification using M = I / A (image size / actual size)
- Always convert units correctly: 1 mm = 1000 µm
Make this stick
Signing in gives access to all PrepWise features.